
INSTALL_OMNIA_CONTROL_PLANE.md 70 KB
Install the Omnia Control Plane
Typical layout of a HPC cluster supported by Omnia 1.2
Using Omnia 1.2, you can provision and monitor hardware devices such as servers, storage devices, network switches, and InfiniBand switches in an HPC cluster. To enable Omnia to provision or configure the supported hardware devices, Omnia requires the following connections to be made available in your HPC cluster environment.
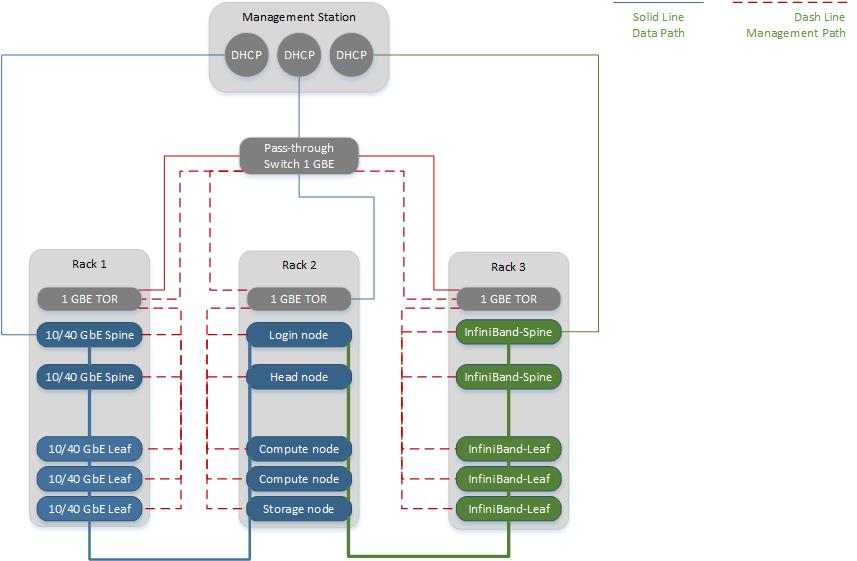
- Connecting a Pass-Through Switch: Provision and configure a 1GBE pass-through switch which will be used as a pass-through uplink switch. One of the NIC on the management station must be connected to a data port on the pass-through switch and a second connection must be established from a data port on the pass-through switch to the management port of the TOR network switch.
>> Note: Omnia is not responsible for provisioning and configuring the pass-through switch. - Establishing a management network: From the data ports on the pass-through switch, connect to the following ports:
- iDRAC ports on manager and compute nodes
- Management port on the network switches
- Management port on the PowerVault devices
- Management port on the InfiniBand switches
Through this management network, management DHCP assigns IP addresses to the devices in the HPC cluster.
- Establishing a data network:
- Connect one of the data ports on the PowerVault device to the NIC of the compute node.
- For InfiniBand DHCP, connect NIC on the management station to one of the data ports of the InfiniBand Switch. Next, connect one of the data ports of the InfiniBand switch to the NIC on the compute node.
- Establishing a host network: For Cobbler DHCP to assign an IP address to the compute node NIC, connect NIC of the management station to the data port on the network switch. Connect another data port on the network switch to the NIC on the compute node. Omnia will provision OS on the compute nodes using PXE when the iDRAC Enterprise license is missing on any of the compute nodes in the HPC cluster.
Note: Cobbler web support has been discontinued from Omnia 1.2 onwards.
Depending on the pass-through switch configured in your HPC environment, the number of racks will be limited based on the number of ports available on the pass-through switch. To support additional racks, you can form an L1-L2 topology and configure a network of Passthrough Switches. A typical layout of an HPC cluster with a network of pass-through switches is as per the following illustration:

Prerequisites to install the Omnia Control Plane version 1.2
- Ensure that a stable Internet connection is available on management station, manager node, login node, and compute nodes.
- Rocky 8 /Leap 15.3 is installed on the management station.
To provision the bare metal servers, download one of the following ISOs for deployment:
For DHCP configuration, you can provide a host mapping file. If the mapping file is not provided and the variable is left blank, a default mapping file will be created. The provided details must be in the format: MAC address, Hostname, IP address, Component_role. For example,
10:11:12:13,server1,100.96.20.66,computeand14:15:16:17,server2,100.96.22.199,managerare valid entries.Note:
- In the omnia/examples folder, a mapping_host_file.csv template is provided which can be used for DHCP configuration. The header in the template file must not be deleted before saving the file.
- The Hostname should not contain the following characters: , (comma), . (period) or _ (underscore). However, the domain name is allowed commas and periods.
- The Hostname cannot start or end with a hyphen (-).
- No upper case characters are allowed in the hostname.
- The hostname cannot start with a number.
- In the omnia/examples folder, a mapping_host_file.csv template is provided which can be used for DHCP configuration. The header in the template file must not be deleted before saving the file.
Connect one of the Ethernet cards on the management station connected to the HPC switch and the other Ethernet card must be connected to the internet network.
You must have root privileges to perform installations and configurations using the Omnia control plane.
On the management station, ensure that Python 3.6 and Ansible are installed (The following commands are compatible with all 3 OS's unless marked otherwise).
Run the following commands to install Python 3.6:
Leap OS CentOS, Rocky Verify the version of Python running: python3 --version
If the version is below 3.6.13, use the below command:zypper install -y python3dnf install epel-release -y
dnf install python3 -yRun the following commands to install Ansible:
 pip3.6 install --upgrade pip
 python3.6 -m pip install ansible
After the installation is complete, run
ansible --versionto verify if the installation is successful. In the output, ensure that the executable location path is present in the PATH variable by runningecho $PATH. If executable location path is not present, update the path by runningexport PATH=$PATH:<executable location>\.
For example,
ansible -- version
ansible 2.10.9
config file = None
configured module search path = ['/root/.ansible/plugins/modules', '/usr/share/ansible/plugins/modules']
ansible python module location = /usr/local/lib/python3.6/site-packages/ansible
executable location = /usr/local/bin/ansible
python version = 3.6.8 (default, Aug 24 2020, 17:57:11) [GCC 8.3.1 20191121 (Red Hat 8.3.1-5)]
The executable location is
/usr/local/bin/ansible. Update the path by running the following command:export PATH=$PATH:/usr/local/binNote: To deploy Omnia, Python 3.6 provides bindings to system tools such as RPM, DNF, and SELinux. As versions greater than 3.6 do not provide these bindings to system tools, ensure that you install Python 3.6 with dnf.
Note: If SELinux is not disabled on the management station, disable it from/etc/sysconfig/selinuxand restart the management station. Note: If Ansible version 2.9 or later is installed, ensure it is uninstalled before installing a newer version of Ansible. Run the following commands to uninstall Ansible before upgrading to newer version.pip uninstall ansiblepip uninstall ansible-base (if ansible 2.9 is installed)pip uninstall ansible-core (if ansible 2.10 > version is installed)
Note: If you are using LeapOS, zypper may need to be updated using this command before running Omnia:
zypper update -yOn the management station, run the following commands to install Git:
Leap OS CentOS, Rocky zypper install -y gitdnf install epel-release -y
dnf install git -y
Note:
- After the installation of the Omnia appliance, changing the management station is not supported. If you need to change the management station, you must redeploy the entire cluster.
- If there are errors while executing any of the Ansible playbook commands, then re-run the commands.
Steps to deploy the Omnia Control Plane
- On the management station, change the working directory to the directory where you want to clone the Omnia Git repository.
- Clone the Omnia repository using the command:
git clone https://github.com/dellhpc/omnia.git - Change the directory to omnia using the command:
cd omnia - Edit the omnia_config.yml file to:
- Specify the Kubernetes version which will be installed on the manager and compute nodes in the k8s_version variable. By default, it is set to 1.16.7. Edit this variable to change the version. Supported versions are 1.16.7 and 1.19.3.
- To configure a login node in the cluster. By default, the login_node_required variable is set to "true". Using the login node, cluster administrators can provide access to users to log in to the login node to schedule Slurm jobs. However, if you do not want to configure the login node, then you can set the variable to "false". Without the login node, Slurm jobs can be scheduled only through the manager node.
Note: Ensure that the parameter
enable_security_supportintelemetry\input_params\base_vars.ymlis set to 'false' before editing the following variables.
To configure the login node, refer to Install_Omnia.
- To enable security features on the Management Station, use the steps provided here.
- To deploy Grafana on the Management Station, use the steps provided here.
Note:
- Supported values for Kubernetes CNI are calico and flannel. The default value of CNI considered by Omnia is calico.
- The default value of Kubernetes Pod Network CIDR is 10.244.0.0/16. If 10.244.0.0/16 is already in use within your network, select a different Pod Network CIDR. For more information, see https://docs.projectcalico.org/getting-started/kubernetes/quickstart.
- The default path of the Ansible configuration file is
/etc/ansible/. If the file is not present in the default path, then edit theansible_conf_file_pathvariable to update the configuration path.- If you choose to enable security on both the Management Station, simply follow the steps mentioned here.
- Change the directory to control_plane/input_params using the command:
cd omnia/control_plane/input_params - Edit the base_vars.yml file to update the following variables:
| Variables [Required/ Optional] | Default, Accepted values | Description |
|---|---|---|
| device_config_support [Required] | false, true | This variable decides whether Management IPs are to be assigned to all devices. |
| idrac_support [Required] | false, true | This boolean indicates that Management IPs are assigned and can be taken from device_list_path for communication. If device_config_support is true, idrac_support has to be set to true. |
| device_ip_list_path [Optional] | File Path where all pre-assigned Management IPs are provided. This field is mandatory if idrac_support is true. A sample template is provided here: omnia/examples/device_ip_list.yml Please ensure that all listed IPs are reachable to the management station via the Public internet |
|
| ethernet_switch_support [Required] | false, true | This boolean decides whether Ethernet Switches are to be configured. |
| ib_switch_support [Required] | false, true | This boolean decides whether Infiniband Switches are to be configured. |
| powervault_support [Required] | false, true | This boolean decides whether PowerVaults are to be configured. |
| ansible_conf_file_path [Required] | /etc/ansible | Directory path with the Ansible configuration file (ansible.cfg). If Ansible is installed using pip, provide the directory path. If the path is not provided, it is set as /etc/ansible, by default. |
| public_nic [Required] | eno2 | The NIC or Ethernet card connected to the public internet. |
| appliance_k8s_pod_net_cidr [Required] | 192.168.0.0/16 | Kubernetes pod network CIDR for appliance k8s network. Ensure this value does not overlap with any of the host networks. |
| snmp_trap_destination [Optional] | Enter an SNMP server IP address to receive SNMP traps from devices in the cluster. If this variable is left blank, SNMP will be disabled. | |
| snmp_community_name | [Required]public | SNMP community name. |
| awx_organization [Required] | DellEMC | Organization name configured in AWX. |
| timezone [Required] | GMT | Enter a timezone that is set during the provisioning of OS. GMT is set as the default time zone. You can set the time zone to EST, CET, MST, CST6CDT, or PST8PDT. For a list of available time zones, see the appliance/common/files/timezone.txt file. |
| language [Required] | en-US | Set the language used during the provisioning of OS. By default, it is set to en-US. |
| iso_file_path [Required] | /root/Rocky-8.x-x86_64-minimal.iso, /root/openSUSE-Leap-15.3-NET-x86_64-Media.iso |
Provide the relevant ISO file path. This ISO file is used by Cobbler to provision the OS on the compute nodes. Note: It is recommended that the ISO image file is not renamed. And, you must not change the path of this ISO image file as the provisioning of the OS on the compute nodes may be impacted. |
| mngmnt_network_nic [Optional] | eno1 | NIC or Ethernet card that is connected to the Management Network to provision the devices. By default, it is set to "eno1". |
| mngmnt_network_dhcp_start_range, mngmnt_network_dhcp_end_range | [Optional]172.19.0.100, 172.19.0.200 | DHCP range for the Management Network to assign IPv4 addresses. |
omnia/examples. Enter the details in the order: MAC address, IP address. For example, 10:11:12:13,1.2.3.4, 14:15:16:17,2.3.4.5, and 18.19.20.21,3.4.5.6 are all valid entries. Ensure that you do not provide any duplicate entries in the file.omnia/examples. Enter the details in the order: MAC address, Hostname, IP address, Component_role. For example, 10:11:12:13,server1,100.96.20.66,compute, 14:15:16:17,server2,100.96.22.199,manager, 18.19.20.21,server3,100.96.23.67,nfs_node, and 22.23.24.25,server4,100.96.23.75,login_node are all valid entries. The Hostname should not contain the following characters: , (comma), . (period), and - (hyphen). Ensure that you do not provide any duplicate entries in the file. If
device_config_support is true, PXE will be used. Note : This parameter is case sensitive.
When
telemetry.yml is run, both the timescaledb and the mysqldb are stored here.This parameter is mandatory if
ib_switch_support is true.This parameter is mandatory if
ib_switch_support is true.NOTE: The IP address 192.168.25.x is used for PowerVault Storage communications. Therefore, do not use this IP address for other configurations.
- Provided that the host_mapping_file_path is updated as per the provided template, Omnia deploys the control plane and assigns the component roles by executing the omnia.yml file. To deploy the Omnia control plane, run the following command:
ansible-playbook control_plane.yml - If the host_mapping_file_path is not provided, then you must manually assign the component roles through the AWX UI. Go to Assign component roles using AWX UI.
Omnia creates a log file which is available at: /var/log/omnia.log.
Configurations Performed by Omnia Control Plane
The installation of omnia control plane depends largely on the variables entered in base_vars.yml. These variables decide how many functionalities of Omnia are actually required in your environment.
Omnia Control plane starts with the choice of assigning management/communication IPs (device_config_support) to all available servers, switches and powervault devices. When true, all applicable devices are given new IPs via the PXE boot method. If device_config_support is false, the idrac_support value is checked. If true, the devices are expected to have their own IPs furnished in the filepath mentioned under device_ip_list_path. Having the IPs allows omnia to reach and configure switches, servers and powervaults without disturbing the existing network set up. Users can choose which devices require configuration using the variables ethernet_switch_support, ib_switch_support and powervault_support.
| device_config_support | idrac_support | Outcome |
|---|---|---|
| true | true | New Management IPs will be assigned and servers will be provisioned based on the value of provision_method |
| true | false | An assert failure on control_plane_common will manifest and Omnia Control Plane will fail. |
| false | true | Omnia will not assign IPs to the devices/iDRAC. Deployment will take place via the IPs provided in device_ip_list_path based on the provision_method. |
| false | false | No IPs will be assigned by Omnia. Provisioning will only be through PXE. Slurm and Kubernetes can be deployed in the cluster. |
Once all network configuration is complete, Omnia uses AWX to integrate a centralized log system, receive live updates of running jobs, scheduled jobs, etc. AWX can also be used to assign component roles, install kuberenetes, JupyterHub, Kubeflow, Slurm, Prometheus and Grafana.
Credentials used by Omnia
The file login_vars.yml is populated with all credentials used by Omnia to deploy services.
If you want to view or edit the login_vars.yml file, run the following commands:
cd input_paramsansible-vault view login_vars.yml --vault-password-file .login_vault_keyoransible-vault edit login_vars.yml --vault-password-file .login_vault_key.
NOTE: It is suggested that you use the ansible-vault view or edit commands and that you do not use the ansible-vault decrypt or encrypt commands. If you have used the ansible-vault decrypt or encrypt commands, provide 644 permission to login_vars.yml.
Below are all the parameters in login_vars.yml
| Parameter | Default, Accepted values | Additional Information |
|---|---|---|
| provision_password [Required] | Password used when deploying the OS on bare metal servers. Minimum Length: 8 characters Forbidden Characters: -,\, '," |
|
| cobbler_password [Required] | Password used to authenticate cobbler Minimum Length: 8 characters Forbidden Characters: -,\, '," |
|
| idrac_username [Optional] | Username used to authenticate iDRAC Minimum Length: 8 characters Forbidden Characters: -,\, '," |
|
| idrac_password [Optional] | Password used to authenticate iDRAC Forbidden Characters: -,\, '," This parameter is required if idrac_support is true. |
|
| awx_password | Password used to authenticate AWX Minimum Length: 8 characters Forbidden Characters: -,\, '," |
|
| grafana_username | Username used to authenticate grafana Minimum Length: 5 characters Forbidden Characters: -,\, '," |
|
| grafana_password | Password used to authenticate grafana Minimum Length: 5 characters Forbidden Characters: -,\, '," Do not set this parameter to 'admin' |
|
| ethernet_switch_username | Username used to login to the Ethernet Switch Forbidden Characters: -,\, '," |
|
| ethernet_switch_password | Password used to login to the Ethernet Switch Forbidden Characters: -,\, '," |
|
| ib_username | Username used to login to the Infiniband Switch Forbidden Characters: -,\, '," |
|
| ib_password | Password used to login to the Infiniband Switch Forbidden Characters: -,\, '," |
|
| powervault_me4_username | Username used to login to the PowerVault Forbidden Characters: -,\, '," |
|
| powervault_me4_password | Password used to login to the PowerVault Forbidden Characters: -,\, '," |
|
| ms_directory_manager_password | Password to authenticate Admin level access to the directory for system management tasks and will be added to the instance of directory server created for IPA. Minimum Length: 8 characters Forbidden Characters: -,\, '," |
|
| ms_kerberos_admin_password | Password authenticating the 'admin' account on the IPA server. If 389ds is in use, this field authenticates the Kerberos Admin. |
Default Ansible AWX configurations
- The role used to deploy AWX within the control_plane.yml file: webui_awx.
- All the pods are deployed in the specific namespace: awx.
- The AWX reference source code repository: https://github.com/ansible/awx.git
Omnia performs the following configurations on AWX:
- The organization's name is set to DellEMC.
- The project name is set to omnia which is the playbooks directory for the templates.
- For networking switches, InfiniBand switches, iDRAC, and PowerVault Storage, four inventories are available- ethernet_inventory, infiniband_inventory, idrac_inventory, provisioned_idrac_inventory, and powervault_me4_inventory.
- IP addresses of the hosts are stored in node_inventory.
- The device credentials are stored in idrac_credential, ethernet_credential, infiniband_credential, and powervault_me4_credential. The node_credential stores the credentials of nodes in the cluster.
- Four groups are created under node_inventory-manager, compute, login, and nfs. All nodes in the inventory are to be added to these groups from the AWX UI by the user.
- iDRAC, networking switches, InfiniBand switches, and PowerVault storage devices can be configured using the respective templates: idrac_template, ethernet_template, infiniband_template, and powervault_me4_template. deploy_omnia_template is used to deploy Kubernetes and Slurm on the compute nodes.
- Schedules are created for the node_inventory_job (every 10 minutes) and the device_inventory_job (once daily) to dynamically retrieve and update node and device details to AWX.
Note: The AWX configurations are automatically performed by Omnia, and Dell Technologies recommends that you do not change the default configurations that are provided by Omnia as the functionality may be impacted.
Configuring new devices added to the cluster
For Omnia to configure the devices and to provision the bare metal servers which are introduced newly in the cluster, you must configure the corresponding input parameters and deploy the device-specific template from the AWX UI. Based on the devices added to the cluster, click the respective link to go to configuration section.
- Configure Dell EMC PowerSwitches
- Provision OS on PowerEdge Servers
- Configure Mellanox InfiniBand Switches
- Configure PowerVault Storage
Assign component roles using AWX UI
- Run
kubectl get svc -n awx. - Copy the Cluster-IP address of the awx-ui.
- To retrieve the AWX UI password, run
kubectl get secret awx-admin-password -n awx -o jsonpath="{.data.password}" | base64 --decode. - Open the default web browser on the management station and enter
http://<IP>:8052, where IP is the awx-ui IP address and 8052 is the awx-ui port number. Log in to the AWX UI using the username asadminand the retrieved password. - On the AWX dashboard, under RESOURCES -> Inventories, select node_inventory.
- Select the Hosts tab.
- To add hosts to the groups, click +.
- Select Existing Host, and then select the hosts from the list and add them to the groups--compute, manager, login, or nfs.
If you have set thelogin_node_requiredvariable in theomnia_configfile to "false", then you can skip assigning host to the login node. - If the login_node_required is true, make sure the hostnames of all the nodes in the cluster especially the manager and login node are in the format: hostname.domainname. For example, manager.omnia.test is a valid FQDN. If the Hostname is not set then freeipa server/client installation will fail.
- Click SAVE.
- To deploy Kubernetes and Slurm containers on PowerEdge Servers, under RESOURCES -> Templates, select deploy_omnia, and then click LAUNCH.
- By default, no skip tags are selected, and both Kubernetes and Slurm are deployed.
- To install only Kubernetes, enter
slurmand select slurm. - To install only Slurm, select and add
kubernetesskip tag.
NOTE: If you would like to skip the NFS client setup, enter
nfs_clientin the skip tag section to skip the k8s_nfs_client_setup role of Kubernetes.
- Click NEXT.
- Review the details in the PREVIEW window and click LAUNCH to run the DeployOmnia template.
The deploy_omnia_template may not run successfully if:
- The manager group contains more than one host.
- The manager, compute, login, and nfs groups do not contain a host. Ensure that you assign at least one host node to these groups.
If you have set thelogin_node_requiredvariable in theomnia_configfile to "false", then you can skip assigning host to the login node. - Under Skip Tags, when both kubernetes and slurm tags are selected.
Note: On the AWX UI, hosts will be listed only after few nodes have been provisioned by Omnia. It takes approximately 10 to 15 minutes to display the host details after the provisioning is complete. If a device is provisioned but you are unable to view the host details on the AWX UI, then you can run the following command from omnia -> control_plane -> tools folder to view the hosts which are reachable.
ansible-playbook -i ../roles/collect_node_info/provisioned_hosts.yml provision_report.yml
Install JupyterHub and Kubeflow playbooks
If you want to install JupyterHub and Kubeflow playbooks, you have to first install the JupyterHub playbook and then install the Kubeflow playbook.
To install JupyterHub and Kubeflow playbooks:
- From AWX UI, under RESOURCES -> Templates, select DeployOmnia template.
- From PLAYBOOK dropdown menu, select platforms/jupyterhub.yml and launch the template to install JupyterHub playbook.
- From PLAYBOOK dropdown menu, select platforms/kubeflow.yml and launch the template to install Kubeflow playbook.
Note: When the Internet connectivity is unstable or slow, it may take more time to pull the images to create the Kubeflow containers. If the time limit is exceeded, the Apply Kubeflow configurations task may fail. To resolve this issue, you must redeploy Kubernetes cluster and reinstall Kubeflow by completing the following steps:
- Complete the PXE booting of the head and compute nodes.
- In the
omnia_config.ymlfile, change the k8s_cni variable value from calico to flannel. - Run the Kubernetes and Kubeflow playbooks.
NOTE: If you want to view or edit the omnia_config.yml file, run the following command:
ansible-vault view omnia_config.yml --vault-password-file .omnia_vault_key-- To view the file.ansible-vault edit omnia_config.yml --vault-password-file .omnia_vault_key-- To edit the file.Roles assigned to the compute and manager groups
After DeployOmnia template is run from the AWX UI, the omnia.yml file installs Kubernetes and Slurm, or either Kubernetes or Slurm, as per the selection in the template on the management station. Additionally, appropriate roles are assigned to the compute and manager groups.
Kubernetes roles
The following kubernetes roles are provided by Omnia when omnia.yml file is run:
- common role:
- Install common packages on manager and compute nodes
- Docker is installed
- Deploy time ntp/chrony
- Install Nvidia drivers and software components
- k8s_common role:
- Required Kubernetes packages are installed
- Starts the docker and Kubernetes services.
- k8s_manager role:
- helm package for Kubernetes is installed.
- k8s_firewalld role: This role is used to enable the required ports to be used by Kubernetes.
- For head-node-ports: 6443, 2379-2380,10251,10250,10252
- For compute-node-ports: 10250,30000-32767
- For calico-udp-ports: 4789
- For calico-tcp-ports: 5473,179
- For flanel-udp-ports: 8285,8472
- k8s_nfs_server_setup role:
- A nfs-share directory,
/home/k8snfs, is created. Using this directory, compute nodes share the common files.
- A nfs-share directory,
- k8s_nfs_client_setup role
- k8s_start_manager role:
- Runs the /bin/kubeadm init command to initialize the Kubernetes services on manager node.
- Initialize the Kubernetes services in the manager node and create service account for Kubernetes Dashboard
- k8s_start_workers role:
- The compute nodes are initialized and joined to the Kubernetes cluster with the manager node.
k8s_start_services role
- Kubernetes services are deployed such as Kubernetes Dashboard, Prometheus, MetalLB and NFS client provisioner
- Kubernetes services are deployed such as Kubernetes Dashboard, Prometheus, MetalLB and NFS client provisioner
Whenever the k8s_version, k8s_cni or k8s_pod_network_cidr needs to be modified after the HPC cluster is setup, the OS in the manager and compute nodes in the cluster must be re-flashed before executing
omnia.ymlagain.After Kubernetes is installed and configured, few Kubernetes and calico/flannel related ports are opened in the manager and compute nodes. This is required for Kubernetes Pod-to-Pod and Pod-to-Service communications. Calico/flannel provides a full networking stack for Kubernetes pods.
If Kubernetes Pods are unable to communicate with the servers (i.e., unable to access the Internet) when the DNS servers are not responding, then the Kubernetes Pod Network CIDR may be overlapping with the host network which is DNS issue. To resolve this issue:
- Disable firewalld.service.
- If the issue persists, then perform the following actions:
a. Format the OS on manager and compute nodes.
b. In the management station, edit the omnia_config.yml file to change the Kubernetes Pod Network CIDR or CNI value. Suggested IP range is 192.168.0.0/16 and ensure you provide an IP which is not in use in your host network.
c. Executeomnia.ymland skip slurm using--skip-tags slurm.
Slurm roles
The following Slurm roles are provided by Omnia when omnia.yml file is run:
- slurm_common role:
- Installs the common packages on manager node and compute node.
- slurm_manager role:
- Installs the packages only related to manager node
- This role also enables the required ports to be used by Slurm.
tcp_ports: 6817,6818,6819
udp_ports: 6817,6818,6819 - Creating and updating the Slurm configuration files based on the manager node requirements.
- slurm_workers role:
- Installs the Slurm packages into all compute nodes as per the compute node requirements.
- slurm_start_services role:
- Starting the Slurm services so that communicates with manager node.
- slurm_exporter role:
- Slurm exporter is a package for exporting metrics collected from Slurm resource scheduling system to Prometheus.
- Slurm exporter is installed on the host like Slurm, and Slurm exporter will be successfully installed only if Slurm is installed.
Login node roles
To enable the login node, the login_node_required variable must be set to "true" in the omnia_config.yml file.
- login_common role: The firewall ports are opened on the manager and login nodes.
- login_server role: FreeIPA server is installed and configured on the manager node to provide authentication using LDAP and Kerberos principles.
- login_node role: For Rocky, FreeIPA client is installed and configured on the login node and is integrated with the server running on the manager node. For LeapOS, 389ds will be installed instead.
Note: If LeapOS is being deployed, login_common and login_server roles will be skipped.
Add a new compute node to the cluster
If a new node is provisioned through Cobbler, the node address is automatically displayed on the AWX dashboard. The node is not assigned to any group. You can add the node to the compute group along with the existing nodes and run omnia.yml to add the new node to the cluster and update the configurations in the manager node.
Creating a new cluster
From Omnia 1.2, the cobbler container OS will follow the OS on the management station but will deploy multiple OS's based on the provision_os value in base_vars.yml.
- When creating a new cluster, ensure that the iDRAC state is not PXE.
- On adding the cluster, run the iDRAC template before running
control_plane.yml - If the new cluster is to run on a different OS than the previous cluster, update the parameters
provision_osandiso_file_pathinbase_vars.yml. Then runcontrol_plane.yml
Example: In a scenario where the user wishes to deploy LEAP and Rocky on their multiple servers, below are the steps they would use:
- Set
provision_osto leap andiso_file_pathto/root/openSUSE-Leap-15.3-DVD-x86_64-Current.iso.- Run
control_plane.ymlto provision leap and create a profile calledleap-x86_64in the cobbler container.- Set
provision_osto rocky andiso_file_pathto/root/Rocky-8.x-x86_64-minimal.iso.- Run
control_plane.ymlto provision rocky and create a profile calledrocky-x86_64in the cobbler container.